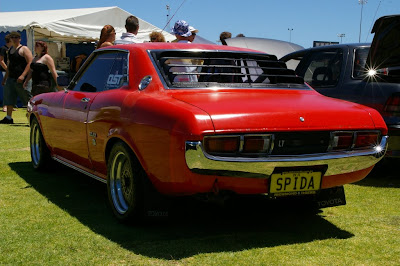
Wednesday, November 19, 2014

Toyotas in the Park 2014

Sorry it's been ages since I made a post. Been very busy with things and forgot to post.

The car has been going well, except for a few things I needed to sort out. Such as getting the diff rebuilt following an enthusiastic day at Barbagallo Raceway late last year. So, after fixing that and replacing the clutch with a new custom heavy duty organic clutch (was slipping when Dyno'ing the new Haltech tune) it was back to C-Red to do a proper tune. The car is now probably running the best it's ever run since I've owned the car. Back to starting easily and idling well, like when it was running the stock ECU, but with all the performance extracting the most from the turbo/engine combination that it originally definitely DID NOT have!

Also, got the hoops of the Simmons re-polished following a mishap with the wrong wheel cleaner - Grrrrrrrr!

So, some shots of the car from TECCWA's Toyotas in the Park held in October, and a couple from the last Red Mist Autokhana event where I had a run.


Saturday, March 10, 2012

It's Alive!
OK, sorry it's taken a long while for a new post, but things have been extremely busy since the last post. Anyway, I can finally report that SPIDA is finally running again, after approximately 2 years off the road.

After some electrical issues, fixed by Schultz Auto Electrics, a new battery, some new tyres and other general things, I've taken SPIDA for a few drives recently, including it's first Autokhana run in February:


Followed by a cruise to the TECCWA Coffee Convergence last weekend in Fremantle:

From TECCWA-Coffee-Feb-2012


And a little while back, at the Japanese Car Day, it made a debut even though it wasn't running/complete at the time:

From Japanese Car Day 2011

Wednesday, December 21, 2011

Engine is In - Just need it to fire now

It's amazing how many things, big and little, need to be done in order to be ready to try fire-up SPIDA. However, I've pretty much got there. Unfortunately though, it's not quite starting. Probably a combination of bad earths (that I'm trying to check), an old battery, and (for a few attempts) my stupidity in forgetting to plug-in the Wolf engine management computer controller and entering the PIN required to start it. Doh!

I'll give it another go on the weekend, perhaps after putting in a new battery.

From PaintandBuild


Virtually all the main trim and parts are on, although some main door trim, seats and minor trim needs to be fitted. At the moment though, I'm focused on trying to get it started. Wish me luck!

From PaintandBuild

Sunday, September 25, 2011

Slow Progress
Well, due to lots of distractions such as work, I've taken a lot longer to get SPIDA back together than I thought. However, I've got back into it the last few weeks, having re-fitted the new Sprinter coil-overs on the front and some other general work on the car. I'm waiting on some negative camber Roll Centre Adjusters for the front struts to give me the clearance to fit the RX7 calipers.

I've also got another standard TA22 fuel tank, which I plan to fit instead of the Jazz Fuel Cell, with modifications to feed my surge tank via 2 fuel pumps under the car.

Getting the engine bay ready to refit the engine, and fitting the sunroof.

From PaintandBuild

Monday, June 06, 2011

Tackling the Engine Wiring

After some aprehension, I've started relaying the wiring in the engine bay. A bit daunting to start with, but it wasn't that hard once I started. And having a laptop showing the photos I took during the pull-down helped identify where things should go.

From

Tuesday, April 26, 2011

Starting to look like a car again

Well, I've been spending some time while being on 2 weeks holiday putting bits and pieces back in the Celica. As of today, I've put the rear tail lights in, rear bumper, side chrome trim, top door rubbers, door handles and locks, new side badges, front indicators, park lights, headlights and valance chrome trim. Also fitted new carpets and sound proofing today, along with some interior fittings.

Still a bit to go, but at least it's looking like a car again.

From PaintandBuild

Wednesday, April 06, 2011

Painted At Last!
After about a year of stripping and preparation work on my Celica, it finally got painted this week and I have it back home. I'm very happy to see it back in colour, and at a point where I can start putting it back together instead of all the pulling apart and messy work getting to this stage.

If you click on the photo below, you can see a larger version of it. Also, if you click the link beside it to the PaintandBuild album, you can see other photos including new ones as they're added.

From PaintandBuild

Thursday, March 10, 2011

Ready for the Professional Touch
After months of working on the bulk of body repairs and preparation, SPIDA is ready to be dropped-off to my body repair guy and for painting. This is a photo of the car waiting to be collected.

Final touches to the body will be done, before a final coating of Epoxy Primer. After that, the car will be painted, have it's roof lining done, front and rear windows installed, stone protection added, and synthetic internal rust protection applied.

Looking forward to seeing it come back painted as that will mean an end to SANDING!

From RustRepaired

Saturday, December 04, 2010

Slow Progress

Well, it's been slow progress since I got the car back from the major rust repairs. Many due to other non-restoration distractions over a couple of months. Thankfully, I've managed to start setting some time aside to get back into working on SPIDA. It may not be immediately obvious looking at the below picture, but I've been making significant process. I went over the car ensuring any mild surface rust in places not originally covered with Epoxy primer was sanded back and re-prepared. Then, after cleaning everything again, and sanding the primer surface, I've recovered everything except the bonnet with another coat of Epoxy. The bonnet has had some extra treatment with KBS rust protective paint on the rust prone areas, and I'll re-sand and prime it again soon.

I did a similar thing with the bottom of the doors, and have spent some time trying to get the alignment of the doors and panel gaps as good as I can before I start using body filler. I have a little more work to do inside the car with rust treating and proofing the metal that was under the roof lining, which is now removed.

I hope to start applying the fibreglass filler for the seams and doing the general body filler and sanding in the next couple of weeks. I'm hoping to have SPIDA ready to be sent for final painting in 4-6 weeks, but I need to make sure the painter will be able to do it in that timeframe given Christmas, etc. Hopefully, I can look at having a red SPIDA in January to let me start putting it back together.

From RustRepaired

Monday, July 26, 2010

Major Rust Repairs Done

A few weeks ago I picked SPIDA up from Malaga Rust Repairs, who've done a great job cutting and welding the major rusted sections of the car. All the seams have been de-leaded and protected for re-doing. The rusted spare wheel well was cut-out and replaced with a replacement, and various sections around windows, in sills and panels repaired.

In addition to the major rust repair work completed, the underside has also been recoated with proof coat. I now have to start on rough shaping and minor repair work, with a touch-up of the Epoxy coat and possibly a Polyester Spray Filler coat, before the 2-pak Urethane primer and colour coats are done by a professional.

From SPIDA Restoration

Friday, April 09, 2010

Looking Better - Epoxy Coat
Well, after quite a busy and at times frustrating Easter, working to get the car in it's protective coating of Epoxy before the rain (that never arrived) and general air moisture could start corroding the metal, I managed to get it done.

In the end, I only put on a single coat of Epoxy primer (even though 2 should be applied) as I ran-out and couldn't buy any more. As it turns out, the rust repairer told me that 1 coat is enough until the rust repair/welding takes place as, if it's too thick, there can be problems welding through it. So, I'll leave it with the 1 coat for now. Once all the rust and major repairs are done, I'll give it a second coat of Epoxy before moving onto Polyester Spray Filler, Urethane 2K Primer and then the colour/clear coats (assuming I don't just use a Solid 2K colour).

At least the car is starting to look like it's being improved, instead of just pulled apart and looking like a wreck. It is quite motivating, even though it comes with the double-edge sword of seeing all the repairs yet to be done.

From SPIDA Restoration

Friday, April 02, 2010

Blasted!
Well, after several months of "mucking around" with panel repairs and work, last week I bit the bullet and decided to get the shell and majority of panels Soda Blasted, and Sand Blasted where required.

It's turned-out pretty well. And besides some rust, as was expected, things aren't too bad and should be repairable. Currently in the process of cleaning the panels/car after the Soda blasting to remove the residue and things like finger prints before the Epoxy Primer goes on to protect it. Also applied some KBS RustBlast to some areas with surface rust, after a P80 sand.

Hopefully, two coats of Epoxy Primer will go on tomorrow. And then I'll look into getting the rest of the body repairs underway.

From Blasting


Other Pictures of Blasting Results

Sunday, January 31, 2010

Colour Choice

To help me decide between a number of possible reds to paint SPIDA, I bought some sample paint pots, and applied them to a spare fender. The 3 colours in question are:

851 - BMW/Mini Chili Red
3E5 - Toyota Super Red
335 - Toyota Carnival Red

From the front of the fender towards the rear, I painted the above in order. Chili Red furthest to the front, Super Red in the mid section and Carnival Red to the rear of the guard. Although it's hard to see the Super Red in these pictures, I've effectively ruled it out as the lightest and too orange of the 3. My choice is between the Chili Red and the Carnival Red, which is actually the 1974 red used on TA22s. I keep changing my mind, as does Jenelle.

I like both really, and at least now I know with more confidence what the Carnival Red will look like. I was a little afraid it would be either too orange or brown in tone. So, just deciding whether to keep it "period correct" or go with the Chili Red, which I have a slight preference for in general.

From SPIDA Restoration

Friday, January 15, 2010

Chrome
Today I picked-up my freshly re-chromed bumpers and GT bonnet vents, along with repolished trims (5 in all). They've come-up very good. Some small imperfections in the vents, but they weren't great to start with, having some pitting and a small crack. Vinci Chrome did the work, and I'm happy with the results. They suggested that I prime the rear of the bumpers before fitting as the chroming process doesn't actually protect the rear sections from rusting. Good advice, and I'll put a coat of epoxy primer on the back of the bumpers next time I've got the gun setup, and before they go on the car.

From SPIDA Restoration


Also went and spoke to a local "Toyota nut", who has a panel shop and has done quite a few restorations. He's going to come over next Friday and see where I'm at, and give me some advice on what to do next. Given I haven't heard back from the guy I had intended to use, and this guys enthusiasm for classic Toyotas, I think I'm going to use the Toyota guy now.

Monday, November 09, 2009

Onto the Engine

I've largely removed the interior and most exterior panels now. Starting on stripping the engine now, for removal by the end of the week if all goes well.

From SPIDA Restoration


I'm going to a conference the next 2 days, which interupts progress a bit. So, I'll see how far I can get on Thursday and Friday.

Setup the air compressor and lines, but the 15Amp power point I had installed isn't working for some reason. So, will need to wait until Thursday for the electrician to come check things.

From SPIDA Restoration

Tuesday, November 03, 2009

Enclosure and On A Roll

On Monday, some temporary fencing was delivered and erected to enclose the carport during my rebuild efforts.

After removing the passenger door from my donor car for future use on SPIDA to replace the rusty one, I grabbed the jack and played pit crew. MA61 rims onto the spare, crappy 13s onto SPIDA, and the Simmons V4s off ready for reburbishing. After pushing the spare right over, I then put SPIDA on the dolly jacks to be able to move it around the limited work area.

This morning I took of the last of the trim requiring re-chroming and dropped them off at Vinci Chrome:
- Front Bumper
- Rear Bumper
- Lower side trims (actually stainless steel - repolish)
- Front valance trim (as above)
- Bonnet lip trim (as above)
- 2 GT bonnet vents to be rechromed, and then satin polished for 2-tone finish

Dropped the Simmons V4s off to Alliance Rim Repairs too. Sounds like they'll do a good job, and can't wait to see them repolished and painted to their former glory.

Bought a few more supplies to help with the stripping, so onto engine or interior tomorrow.

See, all better, and all systems go for stripping!

From SPIDA Restoration

Sunday, October 25, 2009

SPIDA Strip Down Underway
Well, unfortunately I've been incredibly busy with work the last 12 months due to a major redevelopment of our software, so time spent on SPIDA has been very limited. Having said that though, I have been making significant progress in gearing up for SPIDA's respray.

Last year I purchased a spare 74 TA22 as a parts car, having several parts less rusted than those on SPIDA. I've also been accumulating various parts from door and window rubbers, through to some more suspension parts and bits and pieces I knew I'd be needing to replace.

I also did a 6 week Restoration Spray Painting course at Carlisle TAFE earlier this year, which I highly recommend. This gave me an appreciation of what's involved in getting an old car ready for a good quality paint job, what to look for in paints, etc and to be confident to do some of the work myself. While I still plan to send the car to others for key/professional work, I'm planning to do a lot of the prep and sanding work myself. On that front, I've also purchased several bits of gear to do that.

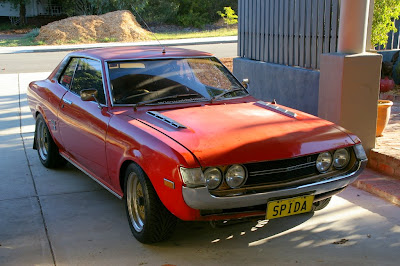
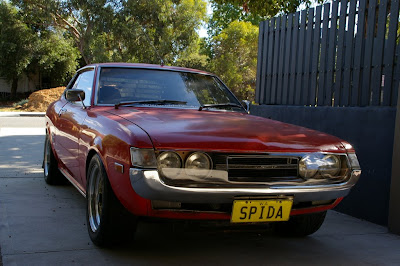
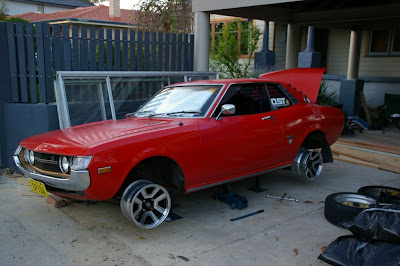
I'm about to have November off work on holidays, and plan to spend 2 weeks of that working on the car. As a "lead-in" to that, I started stripping the car down 3 weeks ago, in terms of removing bumpers, lights and other mainly external parts. Still quite a bit to do, but at least it's underway now. I've also touched base with the shop which I plan to have my rust repairs, etc. done at, and we'll be seeing what progress I've made by mid November and make a plan from there as to whether the whole car or parts start getting fed through for work there.

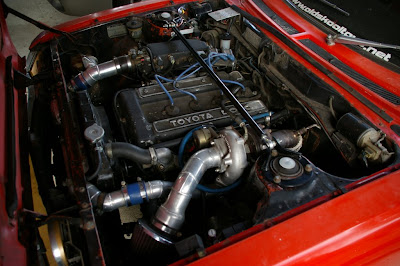
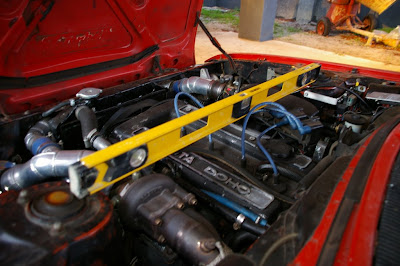
I've also started to make sure things such as an alloy windscreen washer, oil catch can and radiator overflow are fitted, so that any holes I need to drill are done before I prepare/paint the car. I also plan to fabricate a cold-air box for the pod air filter too, again so that any holes for plumbing and fittings are subsequently painted and protected from corrosion. I don't want to drill later if it can be helped.

From SPIDA Restoration


I also removed one of the chrome strips around the rear window, but I think I'll leave this to a professional window remover/fitter as it is probably best left to someone with the right tools, experience, etc. The black "stuff" they use to seal them is amazingly sticky!

The following photo is as of tonight, where I removed the passenger front quarter panel. I've also checked the "donor" bonnet to make sure it will not clash with anything as the old bonnet had cuts in the underside bracing to clear the original turbo plumbing. The "donor" bonnet will fit and work without cutting and has less rust than my original bonnet, so my plan is to use the blue bonnet.

From SPIDA Restoration

Monday, March 02, 2009

T3 Camber Tops and Control Rods
Some more parts for my front suspension upgrade have arrived. These include a set of T3 adjustable camber tops, with upper hat system, some replacement AE86 gland nuts made by T3 and some Tension Control Rods.

I've also got a set of Tokico 5-point adjustable shocks to use also.
Weld-on Coil-over Kit
I bought a weld-on Noltec coil-over kits for the 51mm internal diameter AE86 struts that I'm planning to fit to the Celica. These should allow me to run a good coil-over setup and shorten the struts to suit the TA22.

Wednesday, August 27, 2008

Brake Upgrade
After quite some time of research and checking what I could get to work with 14in rims, and provide me with ventilated/slotted rotors and better calipers, I finally ordered and received some AE86 struts and hubs. Fitted to these are some 262mm Honda EG Civic rotors and Mazda RX7 FC 4-pot rotors, which should work well and fit under my MA61 rims that I use for competition and the 15in Simmons V4 rims.

Here's the pic of the gear as it arrived, with the RX7 caliper just slipped over to check. Now I'll need to move onto checking against the TA22 struts, etc. and see if I'm going to have any issues. Fingers crossed, my research will prove worthwhile.

From Brake Upgrade

Sunday, August 24, 2008

Strut Brace
Well, I finally got hold of a TA22 strut brace and decided to fit it. Might make a little bit of difference to body rigidity in the front, but we'll see if it's noticable.

Also adds a little bit of bling to the engine bay, especially when I get it painted later and colour-matched to the body.

From SPIDA Pictures

Friday, April 18, 2008

Sway Bar Upgrade
I've had problems with one of the 2 swaybars fitted to SPIDA where it could clash with the tyres or rims on full lock. So, I've been on the look-out for a new swaybar and managed to pick-up a 22mm bar (I suspect a Whiteline). So, I removed the standard swaybar, which I think was 19mm, and the other troublesome aftermarket one, which was 20mm, and just fitted the new one in place of the standard one. Fits much better, being no where near the tyres/rims and still 2-3mm thicker than the stock one.

Now I just have to see how the car handles the next time I go for a run. The new one is the centre one in the below pic, with the same shape but thinner and Selby one in yellow.

From SPIDA Pictures

Tuesday, March 04, 2008

GT Bonnet Vents
My GT bonnet vents finally arrived from Canada. So, after a bit of a clean up to remove some surface rust, a spray with some black paint on the filler panels, and a bit of a polish of the chrome to remove the uneven matt finish, I've finally fitted them to SPIDA.

I wasn't always sure I liked them, but I think they look pretty good. And I'm planing to modify the bonnet and increase ventilation when I get closer to the full body respray. I've decided to do in such that I keep the filler panels, and the added venting won't be visible from outside.

From GT Bonnet Vents

Sunday, January 20, 2008

Celica Racing Jacket
Finally got around to fitting my Celica Racing Jacket today. I'd planned to fit it with hinges to allow it to flip forward so I could open the bonnet. But for various reasons, that proved too difficult and the hinges made the jacket not sit quite right.

I ended-up using some clips that hold the bottom edge to the bumper without any screws, holes, etc. That stopped it from pushing into the grill area too far. However I was a bit worried it could still come away and fall off. So, I also fitted some brass threaded rod into one of the 3 headlight surround screw holes, and then used nuts and a wing nut on each side to make sure it doesn't fall off.

From SPIDAs Racing...


Considering my headlight surrounds are painted gold, the brass looks quite good. Anyway, hope you like how it looks. I'll be putting it on for special displays or racing events. But I'll be leaving it off for day to day driving.

Monday, October 29, 2007

OST Dyno Day
Latest Dyno Graphs from OST Dyno Day show 168.9HP run.

From Dyno Charts

Monday, October 01, 2007

Test Fit
Testing the new MA61 rims on SPIDA to check the fit. Now all I need is the tyres.

The +8mm offset is similar offset to the 15x7 Simmons V4's usually on SPIDA (by measuring the backspace, which is very similar), but these rims are 14x7. Hope to get some nice competition rubber soon. Should look and go much better than the old steelies I used last year.


From MA61 Rims Res...
Finished MA61 Rims
I finally finished polishing and re-painting my MA61 rims in readiness for entering some Motorkhanas. The next problem is that I need to find some good 14in RComp tyres, which isn't easy (well cheaply anyway).

The rims have turned-out really well, and can't wait to see them on the car.

From MA61 Rims Res...

Friday, June 15, 2007

Room for Strut Brace?
I've been checking-out some strut braces lately to go across the front struts on the TA22 and keep the chasis stiff (not that it seems to be a major issue). But I wasn't sure if they'd fit across the turbo, etc. So, tonight I took a few pics, and it seems that it shouldn't be too hard as long as the bar either goes straight across inline with the innermost bolts on the struts, or it is positioned further back towards the windscreen. Any further forward is not really an option it seems.

From Strut Brace Pics

The key thing to look at is the gap between the exhaust side housing of the turbo and the spirit level. Looks to have room. Next things in contact would be the EFI manifold, which seems OK and cables and plug wires, but they're flexible anyway.

Saturday, June 09, 2007

MA61 Rims Coming Along
I've finished the polishing of the first rim, which was actually the worst of the 4. It's turned-out pretty good, and now all I have to do to it is paint the infill areas black, which I think will set it off quite well.

For comparison purposes, here's some before and after pics:

From MA61 Rims Res...


From MA61 Rims Res...

Friday, June 08, 2007

Celica Racing Jacket
I've ordered a replica Toyota Racing Jacket for my TA22. It should give it a little bit more of an exclusive look, especially here in Perth where I'm not sure anyone else will have one. If you don't know what a racing jacket is, there are some photos in my gallery below:

From Celica Racing...

Monday, May 28, 2007

MA61 Rims 14x7 (4x114.3)
I saw these for sale on Toymods from one of the WA guys, and thought I'd snap them up for using in Motorkhanas, etc. as they'll look a lot better on my car and will probably fit a lot better than ones I was borrowing of Mitch.

I'm currently polishing them up, and will be adding a bit of black paint to help highlight them. So, let's see how they turn out. The one I'm currently working on, which was the worst of them, is looking prett good so far.

Then I'll just need to source some tyres for them, and SPIDA will be ready again for some more competition, having taken a bit of a breather, and before I take it off the road for the big task of the respray later in the year or next.

MA61 Rims Restoration

Wednesday, May 09, 2007

Model Celica 1600 GT
I finally got my hands on a cool die-cast model of a TA22. I know I run the risk of seeming really dorky now for posting pictures of a model car on my Blog. But still, I love the model, and sure some others will enjoy it.

It's kind of acting as an inspiration for how I might make it look when I respray SPIDA in the next 12-18 months. Which tone of red shall I use? Should I go the stripes? I want a front GT spoiler, but don't want flares or a bobtail spoiler.

Only time will tell I guess...

Toyota Celica 1600GT Model

Saturday, January 20, 2007

Motorvation 2007
OST entered several cars in Motorvation this year, with several of us competing in events, including myself this year in the Slalom and Go-Whoa events. It was a great event, although getting pretty big, and perhaps needing some improvements in the organising stakes. Still, the OST crew seemed to enjoy themselves with the OST BBQ being a head turner.

Lots of pics from the event in the album below, and here's a link to my latest Poster Board (thanks Chris for doing a lot of work on it).


From Motorvation 2007

Saturday, January 13, 2007

OZ Celica Cruise
Wayno organised a cruise for the OZ Celica people, with some great roads through the Perth hills. All was going very nicely, until a few things got "heated" with a couple of cars. Let's just say the less said about that part the better, and checking radiators in summer in Perth is a good idea. We all ended-up having a great "bonding" afternoon and ended-up in the Kalamunda pub for a few drinks, so all ended well. We'll have to give the cruise part another go sometime too
Oz Celica - Perth Cruise 2007

Saturday, December 23, 2006

OST Christmas Cruise
Damo organised a BBQ and a bit of a cruise for the OST guys and girls, and a few Toymods/OZ Celica people too. It was a pleasant afternoon, and nice to catch-up and see some nice Toys.

From OST Christmas...

Saturday, December 09, 2006

MaxAction Final 2006
The OST team competed in the final of the MaxAction series, with Luke and his Dad again doing well. In fact, Luke's Dad won his class! So Luke and his Dad are good guys to get advice from ;-)

Unfortunately Mitch couldn't make it on the day, so Peter took his place and gave his MA61 Celica a run. Ian did alright, but it seems tyre wear may have been having an affect on his times, and I was up with some quicker times. So, either my mods have done the trick or Ian was slowing down - or a bit of both. Sometimes hard to tell where the changes are coming from.

I was pretty happy though as on the day I pulled in quicker times than several guys who had been beating me all season. So, I achieved my goals for the event, but perhaps not the series. But then again, it was a first time and for fun as much as anything.
From MaxAction Fin...

Friday, September 29, 2006

King Low Springs
I decided that my bodyroll issue was more to do with the old springs in my car (probably the higher rear ones) than swaybars as my car already has some pretty big sway bars front and rear - actually 2 on the front!

In addition, my Monroe shocks had been on the car for some time, and could probably do with replacing. I got some good quotes to put coil-overs all round, but I'm not sure it's what I want with the typical harsh ride, etc., even though they're probably the best for competition. I do use the car regularly on "normal" roads afterall.

I decided to get a new set of match Kings Low Springs, which I would fit along with some Tokico HP series shocks that I bought from the US and got a friend to bring out for me. Just a tip, although the Tokico shocks from the US are the right model for a 71-77 Celica, it seems the front struts on the US ones must be longer. I ended-up having to have some custom work done to my front struts to be able to use the front Tokico shocks - bugger!

From SPIDA Pictures


The car now sits much lower than before, possibly lower than I initially liked, but it's growing on me. And there is far less body roll. Ride is a bit harder than before, but not too bad with the progressive nature of the springs, which is why I preferred them over coil-overs - for now anyway!


From SPIDA Pictures

Tuesday, September 19, 2006

Classic Celica Cruise in Perth
Finally, someone organised a cruise just for the old Classic Celicas in Perth. It was great to see some really well looked after and prepared Celicas all together. Not huge numbers though unfortunately like some of the other state's cruises. But hopefully we'll do it again sometime and get a few more people to bring their cars along too.

Maybe one day I'll try organise one with some incentives to get people interested, like a nice destination and possible a professional photo shoot or something? We'll see... And being selfish, I'd like SPIDA to be resprayed and looking it's best for that, so may need to file that idea away for a year or two.

From Classic Celic...

Saturday, September 09, 2006

MaxAction Sept 2006 Event
With the LSD now fitted to SPIDA, and some grippy RComp tyres on loan from Mitch, it was amazing how much better SPIDA stuck to the bitumen and could accelerate compared to before. Unfortunately, I still seemed to lag behind Ian and Mitch, in that order on most runs. My competitiveness was getting a stir, but it was still good fun. But what else was required (besides a better driver) to stop me coming last?

One area still of concern to me, was the amount of bodyroll SPIDA had. It was probably being made more pronounced too due to the extra grip. Whereas before the whole car probably slid in a corner, now the tyres gripped and the body leaned more. I even copped bruising on the elbow from it being banged against the door!

Luke's Dad had also joined in the fun in his Lancer - and he was quicker than Luke, who was already kicking our butts in their N/A little cars, but with much better setup. We were learning power isn't everything, and a good suspension and tyre setup makes a huge difference. Not to mention being good drivers.

From Motorkhana Se...

Wednesday, August 09, 2006

TRD 2-way LSD for SPIDA
Well, much to Jenelle's anguish, I stubled across a TRD 2-way LSD for sale in Japan on EBay for a price I couldn't resist. So, after much pleading and a deal, I was allowed to make the purchase. This should help a lot with the Motorkhanas, etc. that I hope to do in SPIDA in the coming months/years.

I was finding SPIDA too prone to spinning one of it's rear wheels whenever I was trying to get the power down coming out of a corner. It will be "interesting" to see how the LSD helps. I wasn't overly keen on getting a 2-way LSD, as I would have preferred a 1 or 1.5 way LSD, but beggers can't be choosers, and I haven't seen many TRD LSD's around - especially for this price.

Took lots of pics during the process of removing the axles, the open centre, fitting the LSD centre, and then putting it all back in the car. I got Schultz Electrics (they aren't just electrians) to fit the LSD centre into the carrier to make sure it was done properly, and shaved 5mm off one of the axles (as apparently required for the TRD LSD's going into an originally non-LSD TA22 T-series).

Pretty happy with the result. Definitely better at powering out of corners, and not too bad at turning sharp corners at slow speed. But you do notice it, especially on slippery surfaces say where there's some sand on a corner, etc. And 2 wheel spin take-offs are pretty impressive.

TRD 2-way LSD for T-series

Sunday, July 09, 2006

First OST MaxAction Event

The first event of the MaxAction 2006 Series 2 occurred today, and the OST boys turned-up in force to give it a go. The OST crew on the day consisted of:

  • Mitch and his 1GGZE powered RA23
  • Ian and his 13B powered TA22
  • Matty and his WILDSUPRA
  • Luke and his RA40 in Toyota livery
  • Me in my 2TGTEU powered TA22

We all had a great time, especially comparing times amongst eachother, as we a bit off the pace of most people. Great to get together, have a bit of fun, and finally see what the car's were capable of.

Luke set the pace for the day amongst us, leaving the rest of us to wonder where we were going wrong. And Matty was doing some magnificant work getting his big Supra around the course without turning it too much into a drift session.

Ian was pretty quick too, with Mitch also seeming to be a few seconds quicker than me each run. It seems to be the start of my plans to acquire some decent competition tyres and try to get rid of some body roll.


From Motorkhana Ju...